• Subscribe

    Subscribe to This Week In Panospace by eMail.
    Subscribe in a reader
  • License

    Creative Commons License
    This work is © 2008-2012
    by Yuval Levy
    and licensed under a
    Creative Commons License.
  • Entries

    May 2024
    M T W T F S S
     12345
    6789101112
    13141516171819
    20212223242526
    2728293031  
  • Archives

Hugin-2011.0_beta 1 released

I just kicked off a new release cycle with the release of Hugin-2011.0_beta1.

It’s only two months since our last release, and yet the project has made another leap forward.  Pablo improved CPFind (Hugin’s own patent-free control point detector) to the next level.  Darko integrated his Google Summer of Code 2010 project, making the fast preview even more interactive.  Thomas added a gray point picking tool for white balance control.  Vladimir Nadvornik added functionality to register stereo images.  And as usual there are lot of small improvement and bugfixes.

From a process perspective, this is the first time that we run a release with a formal schedule.  During the previous cycle I announced my intentions and mostly stuck to them; and when setting up Hugin on Launchpad I did reflect the previous cycles and releases in the project’s history.  But now dates are being put foward.  No panic, oh Open Source purists!  The dates are purely indicative and the principle still stands:  a release happens when it is ready, not when it is due.

From an infrastructure perspective, this is our first release since SourceForge was attacked.  For the first time I am actively seeking redundancy,  using both project hosting infrastructures available to us:  SourceForge and Launchpad.  The tarball can be downloaded here and here.  Nobody likes SPOFs.

To continue what I hope will become a tradition started with the 2010.4.0 release, this release will be dedicated to Claudius Ptolemaeus and Marinus of Tyre.  Details in the ‘about’ menu of the app.

And to start a new tradition, this release will feature artwork from a Hugin user in the splash screen.  There are a few candidates for it and you, the user, get a chance to choose which one will be adopted.  The cutoff date for the voting will be a few days before the first release candidate.

Enjoy the best Hugin ever!

The Quest is Over

The biggest user misconception about Hugin is with control point (CP) generators.  Contrary to popular belief,  until last week Hugin did not have a CP generator.

Because CP generation is critical to the process of panorama creation; and because Hugin is an interface to the panorama creation process; users misunderstand Hugin for the whole.  Every time CP generation fails they perceive it to be a failure of Hugin.

Packagers (including myself when I was a Windows packager) who ship Hugin for platforms without proper package management (notably: Windows and OSX) have in one way or another bundled CP generators in the past to help making the downloaded package useful.  Despite advanced control for CP placement, many users find Hugin without CP generator to be of limited use.  The packages did not help to lift the misconception, and brought a whole set of problems with them.

Other functions of the panorama production process in Hugin are also performed by third-party tools (e.g. Enblend-Enfuse for blending), but the interface to CP generators is a particularly tricky one because there are (too) many third party CP generators; they take different arguments on the command line; none of them is absolutely superior; and last but not least they are encumbered by patents, limiting what they can be used for and where and how they can be distributed.

So what can be recommended to packagers/distributors and users?

My more than two years old overview of available CP generators is outdated.  None of them is properly maintained.  For example Autopano-SIFT-C version 2.5.2 (that has not even been released) is broken.  It has been broken for more than a year.  The recommendation is to use 2.5.1 until the problems with 2.5.2 are fixed.  No active work was done on fixing 2.5.2, and the command line interface (and thus the string that goes into Hugin’s preferences) has been a moving target as well.

Users rightly complain about the difficulties of configuring a CP generator, and indeed it should not be that difficult.  But the changes in the CP generator need to be coordinated with the changes of parameters in Hugin.  Hugin ships with pre-configured parameters, but Hugin can’t determine if the CP generator is of a version equivalent to the pre-configured parameters.  To make matters worse, packagers may be packing older versions of the CP generators with newer (incompatible) versions of Hugin.

Even the new installer that downloads the CP generators from their original locations is not free of these troubles.  How does it know what version to download and whether there is already a previously installed instance that interferes with the new one?

Ever since accepted as a Google Summer of Code mentoring organization,  the number one priority has been a patent-free CP generator that can be shipped with Hugin.

In 2007, during our first Summer of Code participation, Zoran Mesec implemented a feature matcher with the mentoring help of Herbert Bay (inventor of the SURF algorithm that is implemented in Panomatic).  Paired with existing autopano code, this yielded matchpoint.  In February 2008 Bruno Postle’s built match’n’shift on top of it by using an intermediary projection to improve the quality of the generated CPs.

In 2008, Onur Küçüktunç built a feature descriptor, mentored by Alexandre Jenny of Autopano Pro.  The project provided experience and insights, but performance was not as hoped.  The branch still exist in Hugin’s repository but has been superseeded.

In 2009 students picked up other projects and the idea of the patent-free CP generator seemed to be skipping another year.  But over Christmas Pablo d’Angelo had some time and inspiration, and so in early 2010 the missing piece of the puzzle was created.

Still, it has taken another Summer of Code in 2010, and the determination of Antoine Deleforge and the mentoring of Thomas Modes to complete the work started almost four years ago.  cpfind, the patent-free control point finder has been integrated into Hugin’s default branch and is in the pipeline for a release after the current 2010.2 release.  Maybe before the end of the year?

cpfind will hopefully solve the majority of the problems for the average user.  Until then:

  • Avoid installing too many CP generators.  Choose one that works for you and stick with it.
  • Before using a CP generator from Hugin, try it from the command line.  Start a command prompt, run the CP generator you want to test with no arguments and read its online help and version number.
  • Try running the CP generator from the command line on a few pictures.  Load the resulting file in Hugin and check visually on the Control Points tab if the resulting CPs are good or garbage.
  • Once you are sure that the CPs are good, set the proper preferences in Hugin.  If you have difficulties, ask on the Hugin mailing list, mentioning clearly what version of what CP generator you are dealing with.
  • Alternatively, try entering the CPs manually.  With Hugin’s sophisticated entry system, you don’t even have to click on the exact spot, just make sure it is within the square cursor.  With a pre-calibrated lens, three to four CPs are enough to obtain an excellent result.
  • If you are sure that the CPs in your project are good, but you still don’t achieve a proper alignment, the issue is either with the input images, or how the optimizer is operated.  But that’s material for another article.

Linear Panoramas (Mosaic) Tutorial

Another development cycle is coming to an end.  Bruno released libpano13 2.9.17 and paved the way for Hugin 2010.2.0.   This version of Hugin will bring a lot of new features, amongst others a versatile masking tool and finer grained control of the control point (CP) detection process, courtesy of  Thomas Modes.  Good news for Windows user as well: galvanized by Emanuele Panz and his new NSIS based installer that solves the issues with distribution of patented software, also the Windows users community is on the forefront this time.

Time to do some cool stuff with Hugin:  mosaics.  The basic functionality for mosaics has been in the repository for about a year, and it has matured well.  This morning I set out to shoot and stitch a mosaic.

Stitched mosaics differ from traditional stitched panorama in two major ways:

  • In an ideal mosaic, all images depict a single, perfectly flat subject.
  • The images are taken from different points of view.

Mosaics present a few challenges of their own.  Think of them as protrusions and intrusions from/into the perfectly flat imaginary plane that you are trying to shoot.

Shooting

Not much is flat in the real world.  If parallax prevented seamless concordance in a traditional stitched panorama, depth and perspective prevent seamless concordance in a mosaic.  While parallax can be almost completely eliminated with accurate camera positioning on the no-parallax point, perspective is a given and will be with us throughout the process and into the finished product.  You need to be aware of it while shooting a mosaic more than you need to be aware of moving objects when shooting a stitched panorama.  The tools to deal with it are the same: overlap (plenty!); masking; and, inevitable in this case, retouching/editing.

For this kind of shooting, I first walk parallel to the subject watching how protrusions and intrusions  move relative to the imaginary ideal plane as I move along.  I look for vertical (not necessarily straight)  lines in the plane that could act as stitching seams, i.e. will be unencumbered by protrusions in two adjacent shots.  If I can’t find such a virtual seam line I will have a hard time masking and retouching the seam.  In a second pass I shoot images straight at the subject, one between every pair of the still virtual seam lines, with a lot of overlap.  In a third pass, I take pictures at different angles to “get around” protrusions such as trees that hide areas of interest of the subject.

All images were shot hand held.  Like for traditional panoramas, constant exposure and color are important.

Order

I found that order matters.  I get best results when starting from an anchor image in the middle of the mosaic and working my way to the edges.  To simplify the work flow, once the images are loaded I re-order them in the Images tab, making sure the anchor image is the top one.

Setting the Stage

Start a recent version of Hugin.  You will be switching forth and back between the main window and the fast preview window, so if you have two displays, open them side by side.  Unlike Terry Duell’s suggestions I found that it is not necessary to add images individually to the project, but a little bit of pre-planning is necessary.  There will be some inevitable forth and back as this is an iterative process.

Generate Control Points

Bad news first:  you most likely will have to enter CPs by hand.  That said, it’s easy.

It is paramount that all CPs are on the same plane and no currently existing CP detector known to me meets the condition.  Even small depth errors (e.g. relief on a wall) has big impact.  Avoid CPs between non-contiguous images.  Three or four well distributed (i.e. not on a straight line) CPs are enough.  If vertical lines are present, add one vertical CPs on each image that has them.  Conceptually, the three corners of a triangle in space are enough to define a plane and you are looking to define the common plane between two images.

Start with a Calibrated Lens

I found mosaics optimization to be much more sensible to the starting parameters than spherical optimization; and the outcome to be much more sensible to lens distortion than traditional panoramas.  Get lens distortion out of the way before starting.  If you have saved calibration data for your lens load it now.  Else, here’s a quick fix.
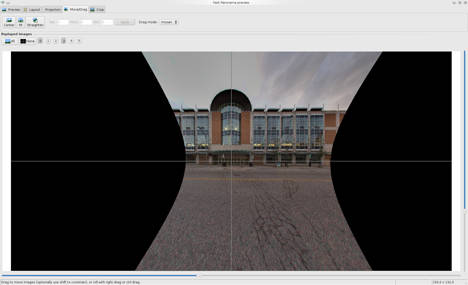
In the Fast Preview window:

  • Hide all images but one with plenty of lines that should be straight in the real world.
  • Select rectilinear projection.
  • Center the preview on the visible image and zoom in on it with the field of view (FoV) sliders.

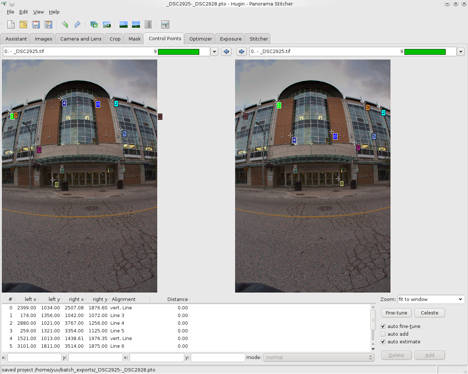
Your goal is to make straight lines look straight, and the Fast Preview window will give you valuable visible feedback. In the Control Points tab, set a few line CPs:

  • Select the visible image into both the left and right panes and start adding CPs on lines.
  • For vertical lines, click on one end of a vertical line in the left pane and on the other end in the right pane.
  • For all other lines do the same, but check that the CP-type drop down says “another line” and the table says “line” and a number.  The name of horizontal CPs is misleading.  Horizontal lines are to identify the horizon itself, not lines parallel to it.

With six well distributed lines you can already get a good approximation.  In the Optimizer tab:

  • Select to optimize “the custom parameter below”
  • Select “only use control points from images visible in the preview window”
  • Deselect all parameters
  • Select only Pitch and Roll of the above image
  • Run a first optimization (and adjust the view in the Fast Preview window if necessary)
  • Deselect all parameters
  • Select Barrel
  • Run a second optimization
  • Select Pitch, Roll and Barrel and optimize them all
  • Now deselect Barrel, and leave the lens parameters alone

There is more to proper lens calibration, but this should be enough approximation for the project at hand.  Confirm visually that the lines are straight in the Fast Preview window before continuing.
Start from the Center

Start with only your anchor/calibration image visible  in the middle of the Fast Preview (in rectilinear projection) and all other images hidden.

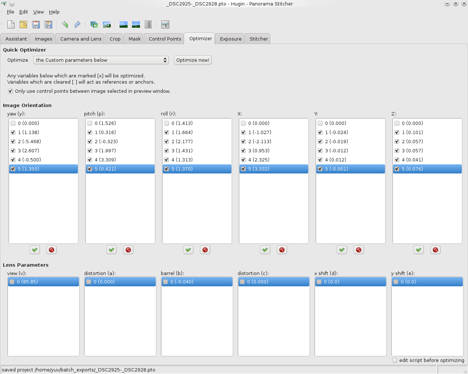
In the Optimizer tab:

  • Select to optimize “the custom parameter below”
  • Select “only use control points from images visible in the preview window”
  • Optimize for Pitch and Roll of the anchor image.  Make sure it’s X/Y/Z parameters are 0 (in the Images tab).

Optimize Image after Image

Repeat the following for each image, always verifying the visual result in the Fast Preview after each optimization.

In the Fast Preview window:

  • Visually check that the current result is approximately OK
  • Adjust the FoV sliders if necessary
  • Make the next image visible

In the Images tab:

  • Select the image that just became visible in the Fast Preview window
  • Edit it’s X value.  Enter a negative value if it is to the left or a positive one if it is to the right.  Over time you will get a feel for the magnitude.  Start with +/-1.  Make sure it is roughly positioned where it belongs, slightly more to the outside than to the inside.

In the Optimizer tab

  • Select to optimize “the custom parameter below”
  • Select “only use control points from images visible in the preview window”
  • Optimize for Yaw, Pitch,  Roll, X, Y, Z of the newly visible image

Repeat for all images.  At the end do one more optimization run, optimizing Yaw, Pitch, Roll, X, Y, Z for all images but the anchor image, and only Pitch and Roll for the anchor image.
Improve Slowly

This is a step by step, image by image process.  And we’re not finished yet.  You may find that the project needs further tweaking.  It’s not an issue of mathematical precision but rather one of controlling the position and warping in critical areas where the different perspectives from the different pictures collide.

Terry suggested dragging the image in the Fast Preview window instead of the above step in the Images Tab.  And indeed the Fast Preview has a Move/Drag tab with mosaic mode.  Unfortunately dragging an image will automatically drag all other images connected by CPs, so unless you do this only once before adding CPs, dragging won’t work. I found the way through the numeric input in the Images tab to be preferable.  It enabled me to go back and rework the positioning of individual images without losing the work done on CPs.
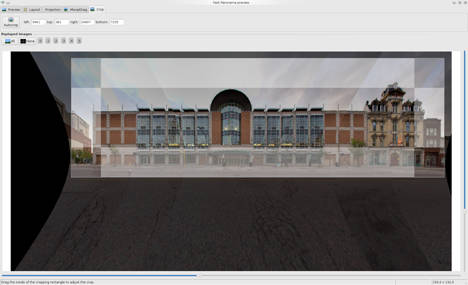
Move/drag in the Fast Preview window is useful associated with cropping functionality.  I use manual cropping in this case, it’s fast and intuitive.  When the mosaic looks good in the Fast Preview window, head to the Stitcher tab and render it.  Make sure to output both the blended panorama and all remapped images by checking the appropriate check boxes.  Hit the Stitch Now button, enter a prefix and go get a deserved break while the computer churns away.

Masking

Hugin has a built in masking tool.  Masking in the input images is more useful for panoramas than for mosaic, because in a well shot panoramas it is reasonable to assume that the images align naturally and the masking is only needed to exclude / include details.  With mosaics, the assumption is wrong, and I prefer to do masking in output images, already warped and aligned, together with editing and some other unspecified fiddling to achieve a visually pleasant result.

Post Processing

Below is a scaled rendering of the blended mosaic.  No post-processing applied yet.  The original is about 21.000 pixels wide.  It’s not bad, but “perspective collisions” are visible at the seams and will require retouching.  It’s time to prepare the project for your favorite image editor.

Copy all the rendered images into a single TIFF file.  On the command line, enter:

$ tiffcp prefix* layeredmosaic.tif

Open the resulting file with Gimp.  The layers will be perfectly aligned.  Add mask layers to them and start editing, or export to a Photoshop file if you are more comfortable with that image editor.  My Photoshop CS 2 (quite old, but still does the job) is not able to open properly the multi-page TIFF file.

Improvements

This was a quick proof of concept / tutorial.  If I was to do something serious with this image, I would probably re-shoot it, taking advantage of the building regularity and adding more images, one in between every pair of columns.

Conclusion

Reaching this advanced stage in the image creation process was relatively easy with Hugin.  Now, depending on your level of perfectionism and intended purposes, there are still hours of editing ahead before the file can be declared good to print.  I don’t have enough wall space available for this 3.5m / 11 feet long mosaic.  If you have and are interested in this or similar commissioned work, I’d like to hear from you.

From Subversion to Mercurial. Part 3, Implementation Day and Beyond

If you followed the steps described in the first and second parts of this series, you should have a Mercurial (Hg) repository ready to replace your project’s Subversion (SVN) repository.  In this third and last part we’ll go over Implementation Day, with particular detail on how to implement this migration on the SourceForge infrastructure.

Test

Can’t test enough.  Your script produces an Hg repository that looks OK on superficial investigation with tools like hg log and hg view.  But does the code build?  Hugin’s build system had a couple of dependencies on SVN and they needed to be updated.  Thomas Modes and Kornel Benko stepped up to the task.  Can developers and builders use this repository?

Educate

On Implementation Day the project will transition from SVN to Hg.  While all relevant contributors are proficient in SVN, Hg was new territory for many.  While progressing on the conversion I kept the community informed and took every opportunity to encourage learning of the new tools, including public tutoring that continues after the transition.  You want to encourage people to share their experiences and learn from each other.  Conceptually the biggest difference between SVN and Hg is that with Hg the repository sits on your local client.  A check in to SVN is the equivalent of a check in and a push to Hg.  Offline operation is not possible with SVN but it is with Hg.  However both are revision control system (RCS) and very similar to use.

Implementation Day Overview

Warn everybody one last time.  Create a new repository on SourceForge for each migrating code line.  Lock down SVN by revoking write access to everybody but a few maintainers who will clean up after the transition.  Run once again the whole migration on a green field, from scratch, to be sure that everything to the very last SVN commit is included.  Test one last time this new local repository (compare it to previous results); create the new repository on SourceForge and push your local repository to it. Last but not least, configure the repository on SourceForge and announce the transition to the world.  Sounds easy.  The devil is in the detail.

Mercurial on SourceForge

SourceForge has been very generous with the projects it is hosting: we can have unlimited Hg repositories.  Unfortunately there are rough edges.

To activate Mercurial for your project:

  • Login via the web as a project administrator and go to the “Develop” page for your project.
  • Select the Project Admin menu, and click on “Feature Settings”.
  • Select “Available Features”.
  • Select the checkbox to the left of the “Mercurial” heading. Your repository will be instantly enabled.

This first repository will be fine but if you want to activate more than one repository you will have to manually set them to be group writable.  To activate additional repositories:

  • Log on to SourceForge’s shell service (assuming you have set up your SSH key) with `ssh -t USER,PROJECTUNIXNAME@shell.sourceforge.net create`
  • Navigate to your project’s Mercurial space with `cd /home/scm_hg/P/PR/PROJECTUNIXNAME`, e.g. for Hugin this would be `cd /home/scm_hg/h/hu/hugin`
  • Create a new directory with the name you want for the repository.  E.g. for Hugin’s website this was `mkdir hugin-web`
  • Execute `hg init DIRNAME` (where DIRNAME is the directory you just created, e.g. `hg init hugin-web`). This will initialize the new repository.
  • Inside the new repository, edit the configuration file .hg/hgrc (see configuration section below)
  • SourceForge rough edge: group write access must be given manually `chmod -R g+w /home/scm_hg/P/PR/PROJECTUNIXNAME/DIRNAME`

Configuration of the Mercurial Repository on SourceForge

SVN support on SourceForge is mature and projects are used to amenities such as email commit notifications.  Hg support is better than what the scant documentation suggests.  Most standard functionality, including email notification, works, even if it is officially unsupported.  One only has to find out how to configure it.  I played around with some trial and error already when optimizing the Enblend repository last year.  This is the hgrc file template that works for us:

[hooks]
changegroup.notify = python:hgext.notify.hook

[email]
from = NOTIFICATION_ADDRESS@lists.sourceforge.net

[smtp]
host = localhost

[web]
baseurl = http://PROJECT.hg.sourceforge.net/hgweb/PROJECT/DIRNAME

[notify]
sources = serve push pull bundle
test = False
config =
template = \ndetails:   {baseurl}{webroot}/rev/{node|short}\nchangeset: {rev}:{node|short}\nuser:      {author}\ndate:       {date|date}\ndescription:\n{desc}\n
maxdiff = -1

[usersubs]
NOTIFICATION_ADDRESS@lists.sourceforge.net = **[trusted]

users = *

You’ll have to replace your own project unix name PROJECT; your own Hg repository top directory DIRNAME; and your own NOTIFICATION_ADDRESS mailing list.  The configuration options are documented.

Committer Write Access

With a dRCS like Mercurial write access has a completely different meaning.  Everybody can `hg clone` an existing repository and once cloned has full write access and can publish their own repository.  The d in dRCS stands for distributed.  Technically there are no more hierarchies and no more central control.  All clones are equal.  Whoever owns a clone can decide to publish it on the web, e.g. with `hg serve`, and give write access to whomever they want.  Granting SourceForge write access only means that the committer can push to the repository hosted on SourceForge.  What makes a repository authoritative is user’s trust, and this is given implicitly by pulling from it.

SourceForge Rough Edges, Again

I wish there was a way to group-manage access rights on SourceForge.  I have not found it.  I needed to revoke SVN access to most developers, and grant them Hg access.  I had to click through each and every contributor registered with the project and single handedly managed their access rights.  To make things worse the pseudo-ajax web interface of SourceForge is everything but asynchronous: it reload the page after each change.  Ajax-cosmetics with underlying old technology from the last century.

One point projects on SourceForge will need to pay attention to are default access rights.  I did not find a place to change those, so every new project member gets by default SVN access right, unless you explicitly remove them.  It seems to me that the defaults on SourceForge are based on the principle of random uncoordinated historical growth.  Have they ever heard of the generally accepted principle of least privilege?  And the default file access for newly created extra Hg repositories is less than reasonable least privilege (see above).

<rant>And don’t tell me about SourceForge’s IdeaTorrent and ways to request and enhancement.  In my experience it does not work and some things on that site have been broken for years when the fix is simple, easy, and does not take much time.  Have you tried to use a SourceForge mailing list archive?</rant>

Push

Now that everything is set, you can simply `hg push` from your local repository to the SourceForge one.  Or if you’re really confident, you can rsync the .hg directory (but don’t forget to edit the .hg/hgrc configuration file on the SourceForge end).

CMake Build System

Our CMake build system depended on SVN and after the push it was broken.  Kornel Benko and Thomas Modes fixed it.  Bruno Postle added a break in the CMake build system in the SVN repository, to warn users of that repository that newer versions are in Hg.  Harry van der Wolf updated the OSX build system.

Conclusion

The disruption was short.  A few hours after going live, developers started committing again, using Hg.  Builders started building and distributing again, using Hg.  The Google Summer of Code students cloned away their own copies of the source code and started working on the next major developments for Hugin.  After taking on the most complex of the code lines in the SVN first,  I migrated the remaining ones over a few hours Sunday night.  Hugin and most of its related projects live now happily in Hg and can easily be converted to other formats, including Bazaar, git, and even SVN.  Initially I thought to mirror the default code branch from Hg to SVN, but our project does not really need that.  Subversion has been made completely redundant by a newer, better, superior tool. Mercurial and its likes would not exist without Subversion, and should be seen as a continuum in the lineage rather than a break from the past.  With Mercurial, Hugin is freer than ever, and you are free to take it further on a journey to the future.  For now Hugin still lives on SourceForge, where the next critical bit of infrastructure is the bug tracker.  But with Mercurial the dependency on SourceForge; and the dependency on any single central service or person; has been further reduced.  Long and Free live Hugin.

Here We Go Again

hugin-logoHugin 2009.2.0 is still warm and fresh out of the oven and I have started the next release cycle. Hugin 2009.4.0 is coming soon to a download server in your neighborhood. The beauty of parallel development without trunk freeze and the discipline of managing the integration queue are starting to pay off: while I was managing the 2009.2.0 release, Tim added lens calibration to trunk and Thomas added a tool to clean outlaying control points by statistical method.

Three simple criteria and three increasing levels of maturity reduced the bottleneck that has plagued Hugin in the past three years as it had to learn to absorb more change than ever.

The three levels of maturity are:

  • “works for me”
  • integration in trunk
  • release to the general public

And the three tests are

  • functionality
  • multi-platform build
  • regression

Works for me

Developers are no longer hindered by trunk freezes. They can work on their ideas any time, simply by branching out a development codeline either locally or in the central subversion repository (I know distributed revision control systems. Andrew implemented Mercurial for Enblend and I love it. Right now Hugin is undergoing enough change. In a quiet moment we’ll open a discussion about the revision control system).

When the implementation is ready to move to the next level, it is checked against the three criteria. A development codeline – whether under revision control or presented as a patch against trunk – is considered mature when:

  • the functionality it is intended to implement works on the developer’s machine (“works for me” condition)
  • it has been tested to build on the major supported platforms (“does not leave them behind” condition) by at least one contributor for each: Windows, OSX, Linux
  • it does not unintentionally break existing functionality (“no regression” condition)

When a development codeline reaches maturity, it enters the integration queue.

Integration Queue

The integration queue is the ordered list of new features / development codelines waiting to be integrated in trunk. The prioritization is a collective decision by consensus of the developers. Silence = consent. The discussion, and the latest version of the list, are on the mailing list.

The integration queue is not set in stone: a change in the maturity status of a feature in waiting is good reason to review/change the ordered list. In any case it is reviewed after every release branching.

The integration queue is all about coordination. The code matures further. Ideally developers talk and there should not be conflicts. In the real world changes in trunk may affect the new functionalities or the other way around. This is the the time to solve this kind of conflicts, and to test the code on a (slightly) broader basis.

A feature from the integration queue is ready to be merged into trunk when

  • the functionality it is intended to implement works on the machines of the testers who bothered to play with the codeline (“works for them” condition)
  • it has been tested that a merge with trunk builds on the major supported platforms (“does not break trunk” condition) by at least one contributor for each: Windows, OSX, Linux
  • it does not unintentionally break existing functionality (“no regression” condition)

This limits the time during which trunk is unavailable. Integration of the features that have gone into 2009.2.0 and will go into 2009.4.0 was almost seamless. And the clean up from the 2009.2 release cycle has benefited trunk so mcuh that the 2009.4 release cycle is expected to be even faster.

If trunk has absorbed a feature from the integration queue and we’re not yet ready for a new release (e.g. because the current release cycle is still on), integration of the next mature feature from the integration queue starts.

Release

Developers are polled once a month whether trunk warrants a release. If there are enough new features and/or bug fixes compared to the last release somebody starts a release cycle. Instead of releasing from trunk, forcing a freeze, we now branch out a release codeline. That release codeline absorbs all the change control that was slowing down development in trunk to a halt. And the polishing changes that it get benefits trunk at the same time.

Again, a release branch is declared matured and released to the public when

  • the functionality it is intended to implement works for a larger number of testers (“works for the public” condition)
  • it has been tested to build on the major supported platforms (lives up to Hugin’s ideal of being “truly cross-platform”)
  • it does not unintentionally break existing functionality (“no regression” condition)

Resources

All of this would not be possible without human resources: developers, translators, builders, documenters. A big thank you goes to all of them for making this new, more dynamic pace of development possible. The recipe is relatively simple: every resource is self-directed. The least control is exercised on it, the more likely it is to contribute to the project. So the only controls are the maturity tests – and they can be self-administered. Self-responsibility and empowerment reign.

To me resources are like water. They will flow to an attractive codeline like a stream flows into a riverbed. Barrages (such as a trunk freeze) only impede the flow. Water finds alternative ways, and so do potential contributors. My only task left is to remove bottlenecks. Let them flow!

Give a Man a Fish

Groundhog protecting his holeSo the Hugin project team released 0.8.0 three weeks ago. What are the expectations, and what does release actually mean?

Some users, particularly in the Windows world, expect the release of a shrink-wrapped product. They expect to click, download, install, use. And of course everything for free.

Easy? Not so quick. What was actually released is nothing more than a tarball, an archive of the source code in a state known to build and work on the major supported platforms. So it could be used to produce executable binaries.

How are those binaries produced? What do they depend upon? What is to be produced? Who does it? How are they distributed? What is missing?

How

The user community has prepared platform-specific instructions. They may not be perfect but do the job.

Dependencies

There are some dependencies that need to be fulfilled for the recipes to work. Besides the obvious ones of enough disk space; a supported operating system; and installation of the building tools, Hugin 0.8.0 depends on other software packages, both at build time and at run time.

On the Ubuntu package description the dependencies are clearly listed. They are roughly the same for all platforms. They include enblend, enfuse, libpano.

What

On most Linux based systems a package manager takes care of the dependencies. This means that the packager only has to build Hugin-0.8.0 itself. The package manager will download and install the appropriate dependencies.

On OSX and Windows there is no package manager. The Hugin-0.8.0 binaries alone are useless. The packager has to do extra work.

Who

Anybody with access to a computer can act as a packager, use the instructions and the tarball to produce executable binaries and do whatever they want with it. It’s free.

Distribution

Anybody can put up the binaries for download anywhere on the internet. In the download section of this blog there are links. On top of that there are two distribution channels with special meaning: the package manager and the official Hugin download page.

The package manager is responsibility of the Linux distributors. They carefully test and approve each package that goes into their distribution. And they don’t backport often. For example, Ubuntu still supports its 8.04LTS distribution until April 2011 for desktops and April 2013 for servers, as well as 8.10, 9.04 and the upcoming 9.10. As of today, the binary of Hugin distributed by the package manager for Ubuntu 8.04LTS is Hugin-0.7.0_beta4. Users of Ubuntu 8.10 are still served with Hugin-0.7.0_beta5. Users of the most recent Ubuntu 9.04 have access to Hugin-0.7.0 binaries. And for the upcoming 9.10, Ubuntu’s plan seems to be to still ship Hugin-0.7.0. We hope that this will change but it is not up to us to change this.

Dependencies Revisited

Specifically, there are three dependencies that currently cause pain. In order of importance:

  1. Enblend and enfuse are mandatory. Without them, Hugin-0.8.0 does not work. The current enblend and enfuse packages have serious problems, causing them to crash. They are a regression compared to previous CVS snapshots, in particular to those versions delivered with the old Windows SDK and with the Hugin-0.7.0 installer for Windows. There are fixes in the staging branch of enblend-enfuse. And Harry has been using that branch to build the OSX Hugin-0.8.0 bundle until his Mac died.
    Unfortunately the staging branch does not build in Windows yet. I researched the problem and fixed part of it (accepted as revision 347 by Christoph Spiel on August 3). Thomas Modes had a look at it before going to holiday and added some more pieces to the solution. But it does not build yet because of Microsoft’s Visual C++ quirks.
  2. Libpano is mandatory. Until recently libpano had a minor but annoying problem: it reverted the language of the user interface to English. Daniel M. German and Thomas Modes solved it in the repository.
  3. A control point generator is a critical. Until recently the autopano-SIFT-C package had serious problems, causing memory leaks and crashes; failing where the previous version bundled with the 0.7.0 OSX bundle and Windows installer succeeded.

On systems with package managers (i.e. Linux) the packager can simply publish Hugin-0.8.0 and rely on the package manager to solve the above listed issues. For systems without package manager the packager must add them to the bundle/installer or to the SDK used to build it.

Distribution Revisited

Distributing a binary that is known to have a regression over previous versions as official release is bad practice. It not only affects the project reputation, it ruins a working system for those users who overwrite the working version with the newer one.

The OSX Hugin users community fixed the problem and an official OSX binary is available from the Hugin site. There is no solution yet in sight for Windows, so currently Windows users are directed to the 0.7.0 installer. Maybe we should direct them to the tarball instead?

Conclusion

Give a man a fish, and you feed him for a day. Teach a man to fish, and you feed him for a lifetime. This works with most of our users ond most supported platforms.

Unfortunately for some Windows users it does not seem to work. Give them free fish and they will come for more. Give them the freedom to feed themselves and they will ignore it.

Preparing the Next Release

hugin-logoHugin 0.8.0 has been released two weeks ago. Like with 0.7.0 the release cycle has been too loaded. We introduced plenty of new features (many developed during Google Summer of Code 2008), but forgot to fix some trivial things such as the location for temporary files (which can grow to gigabytes of size). Moreover, the prolonged trunk freeze has forced developers like Gerry Patterson and Thomas Modes to withhold those incremental improvements and bug fixes that make the difference between a software package with rough edges and a polished application.

I decided it is time to fix our release cycle and changed some things, breaking the old pattern. Most important, I’d like to make development independent of release so that we move continuously forward. I intentionally broke a few things and triggered a healthy discussion. It seems that we reached consensus and I’ve started to clean up the subversion repository. The next release will be 2009.2.

Besides pent up incremental improvement, there are some bigger changes on the horizon, but for 2009.2 we will retain only one of them: Andrew Mihal has added GPU support to nona. This means that users with a modern video card can leverage it for faster processing. This has been ready for a few months and it is time to release it. It will be the main change of the next release.

Our Google Summer of Code students will excuse me if I don’t talk about what’s beyond. This time we won’t make the mistake of loading too many things into one release. Their projects will follow, hopefully in rapid sequence, after 2009.2.

Below I document how I merged Andrew’s nona-GPU branch into trunk, hoping that it will be helpful for other merges. It shall be quick and painless – as long as the new functionality in the development branch does not work, it does not make sense to merge.

I started with a clean slate.

1) I fetched the branch from the repository

 $ svn co https://hugin.svn.sourceforge.net/svnroot/hugin/hugin/branches/nona-gpu h.nona.gpu
 $ cd h.nona.gpu

2) I pointed the browser to the SVN log viewer for the branch

3) I identified the revisions concerned: 3510,3511,3522,3523,3535,3563,3568,3569,3574,3582,3583,3648,4069

4) I created a diff file containing all the changes in the revision

$ svn -r 3510 diff > nonagpu.diff

5) I checked out a fresh trunk

 $ svn co https://hugin.svn.sourceforge.net/svnroot/hugin/hugin/trunk hugin

6) I built to make sure the initial status is known and OK

 $ mkdir ../h.build
 $ cd ../h.build
 $ cmake -DCMAKE_INSTALL_PREFIX=/usr/local ../hugin
 $ make
 $ make package

7) I installed it and tested to make sure it works

8) I moved and applied the patch

 $ mv nonagpu.diff ../hugin
 $ cd ../hugin
 $ svn up
 $ patch -p0 < nonagpu.diff

9) applying the patch identified two conflicts in two CMakeLists.txt files:

 ...
 patching file src/hugin_base/CMakeLists.txt
 Hunk #1 FAILED at 51.
 1 out of 1 hunk FAILED -- saving rejects to file src/hugin_base/CMakeLists.txt.rej
 ...
 patching file src/CMakeLists.txt
 Hunk #1 FAILED at 9.
 1 out of 1 hunk FAILED -- saving rejects to file src/CMakeLists.txt.rej

10) I fixed the conflicts manually

11) I built the merged code to make sure I did not break anything major

 $ mkdir ../h.build
 $ cd ../h.build
 $ cmake -DCMAKE_INSTALL_PREFIX=/usr/local ../hugin
 $ make
 $ make package

12) I installed and tested

13) I looked at each of the revisions concerned in the log viewer, e.g. 3511 to find out if files where addded, deleted or moved, and used the appropriate svn commands to add them. It would have been faster to look at the diff file, but like that I could also read Andrew’s comments and code changes and understand what was going on.

 $ svn add src/hugin_base/panotools/PanoToolsTransformGPU.cpp
 $ svn add src/hugin_base/vigra_ext/ImageTransformsGPU.cpp
 $ svn add src/hugin_base/vigra_ext/ImageTransformsGPU.h

14) In the end I was ready to commit

 $ svn ci

So what is the current status and what is next?

The code added a new dependency on GLEW. Most likely that this breaks the Windows build until the SDK is updated. So we need to update the SDK.

Andrew’s GPU code works and is available with the switch -g to those building trunk SVN4146 or later. I started to investigate support of the feature in the GUI, although in my opinion it is not mandatory to have GUI support to release the new feature.

There are enough new features in trunk so that when at the beginning of September the Hugin developers are polled whether to release or not, chances are that we’ll decide to go into release mode. My wish is to see this release out in September. Even if it will happen before the end of the year, I will be more than happy. Maybe a quantum leap for the project?