• Subscribe

    Subscribe to This Week In Panospace by eMail.
    Subscribe in a reader
  • License

    Creative Commons License
    This work is © 2008-2012
    by Yuval Levy
    and licensed under a
    Creative Commons License.
  • Entries

    May 2024
    M T W T F S S
     12345
    6789101112
    13141516171819
    20212223242526
    2728293031  
  • Archives

Linear Panoramas (Mosaic) Tutorial

Another development cycle is coming to an end.  Bruno released libpano13 2.9.17 and paved the way for Hugin 2010.2.0.   This version of Hugin will bring a lot of new features, amongst others a versatile masking tool and finer grained control of the control point (CP) detection process, courtesy of  Thomas Modes.  Good news for Windows user as well: galvanized by Emanuele Panz and his new NSIS based installer that solves the issues with distribution of patented software, also the Windows users community is on the forefront this time.

Time to do some cool stuff with Hugin:  mosaics.  The basic functionality for mosaics has been in the repository for about a year, and it has matured well.  This morning I set out to shoot and stitch a mosaic.

Stitched mosaics differ from traditional stitched panorama in two major ways:

  • In an ideal mosaic, all images depict a single, perfectly flat subject.
  • The images are taken from different points of view.

Mosaics present a few challenges of their own.  Think of them as protrusions and intrusions from/into the perfectly flat imaginary plane that you are trying to shoot.

Shooting

Not much is flat in the real world.  If parallax prevented seamless concordance in a traditional stitched panorama, depth and perspective prevent seamless concordance in a mosaic.  While parallax can be almost completely eliminated with accurate camera positioning on the no-parallax point, perspective is a given and will be with us throughout the process and into the finished product.  You need to be aware of it while shooting a mosaic more than you need to be aware of moving objects when shooting a stitched panorama.  The tools to deal with it are the same: overlap (plenty!); masking; and, inevitable in this case, retouching/editing.

For this kind of shooting, I first walk parallel to the subject watching how protrusions and intrusions  move relative to the imaginary ideal plane as I move along.  I look for vertical (not necessarily straight)  lines in the plane that could act as stitching seams, i.e. will be unencumbered by protrusions in two adjacent shots.  If I can’t find such a virtual seam line I will have a hard time masking and retouching the seam.  In a second pass I shoot images straight at the subject, one between every pair of the still virtual seam lines, with a lot of overlap.  In a third pass, I take pictures at different angles to “get around” protrusions such as trees that hide areas of interest of the subject.

All images were shot hand held.  Like for traditional panoramas, constant exposure and color are important.

Order

I found that order matters.  I get best results when starting from an anchor image in the middle of the mosaic and working my way to the edges.  To simplify the work flow, once the images are loaded I re-order them in the Images tab, making sure the anchor image is the top one.

Setting the Stage

Start a recent version of Hugin.  You will be switching forth and back between the main window and the fast preview window, so if you have two displays, open them side by side.  Unlike Terry Duell’s suggestions I found that it is not necessary to add images individually to the project, but a little bit of pre-planning is necessary.  There will be some inevitable forth and back as this is an iterative process.

Generate Control Points

Bad news first:  you most likely will have to enter CPs by hand.  That said, it’s easy.

It is paramount that all CPs are on the same plane and no currently existing CP detector known to me meets the condition.  Even small depth errors (e.g. relief on a wall) has big impact.  Avoid CPs between non-contiguous images.  Three or four well distributed (i.e. not on a straight line) CPs are enough.  If vertical lines are present, add one vertical CPs on each image that has them.  Conceptually, the three corners of a triangle in space are enough to define a plane and you are looking to define the common plane between two images.

Start with a Calibrated Lens

I found mosaics optimization to be much more sensible to the starting parameters than spherical optimization; and the outcome to be much more sensible to lens distortion than traditional panoramas.  Get lens distortion out of the way before starting.  If you have saved calibration data for your lens load it now.  Else, here’s a quick fix.

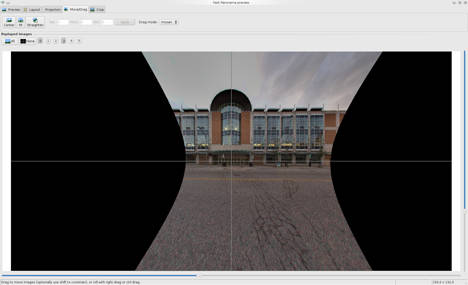
In the Fast Preview window:

  • Hide all images but one with plenty of lines that should be straight in the real world.
  • Select rectilinear projection.
  • Center the preview on the visible image and zoom in on it with the field of view (FoV) sliders.

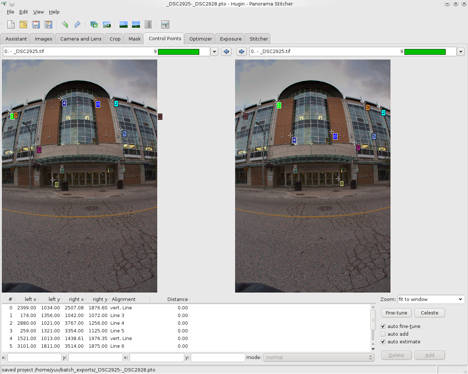
Your goal is to make straight lines look straight, and the Fast Preview window will give you valuable visible feedback. In the Control Points tab, set a few line CPs:

  • Select the visible image into both the left and right panes and start adding CPs on lines.
  • For vertical lines, click on one end of a vertical line in the left pane and on the other end in the right pane.
  • For all other lines do the same, but check that the CP-type drop down says “another line” and the table says “line” and a number.  The name of horizontal CPs is misleading.  Horizontal lines are to identify the horizon itself, not lines parallel to it.

With six well distributed lines you can already get a good approximation.  In the Optimizer tab:

  • Select to optimize “the custom parameter below”
  • Select “only use control points from images visible in the preview window”
  • Deselect all parameters
  • Select only Pitch and Roll of the above image
  • Run a first optimization (and adjust the view in the Fast Preview window if necessary)
  • Deselect all parameters
  • Select Barrel
  • Run a second optimization
  • Select Pitch, Roll and Barrel and optimize them all
  • Now deselect Barrel, and leave the lens parameters alone

There is more to proper lens calibration, but this should be enough approximation for the project at hand.  Confirm visually that the lines are straight in the Fast Preview window before continuing.

Start from the Center

Start with only your anchor/calibration image visible  in the middle of the Fast Preview (in rectilinear projection) and all other images hidden.

In the Optimizer tab:

  • Select to optimize “the custom parameter below”
  • Select “only use control points from images visible in the preview window”
  • Optimize for Pitch and Roll of the anchor image.  Make sure it’s X/Y/Z parameters are 0 (in the Images tab).

Optimize Image after Image

Repeat the following for each image, always verifying the visual result in the Fast Preview after each optimization.

In the Fast Preview window:

  • Visually check that the current result is approximately OK
  • Adjust the FoV sliders if necessary
  • Make the next image visible

In the Images tab:

  • Select the image that just became visible in the Fast Preview window
  • Edit it’s X value.  Enter a negative value if it is to the left or a positive one if it is to the right.  Over time you will get a feel for the magnitude.  Start with +/-1.  Make sure it is roughly positioned where it belongs, slightly more to the outside than to the inside.

In the Optimizer tab

  • Select to optimize “the custom parameter below”
  • Select “only use control points from images visible in the preview window”
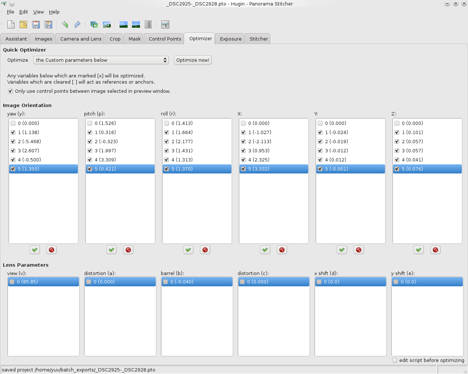
  • Optimize for Yaw, Pitch,  Roll, X, Y, Z of the newly visible image

Repeat for all images.  At the end do one more optimization run, optimizing Yaw, Pitch, Roll, X, Y, Z for all images but the anchor image, and only Pitch and Roll for the anchor image.
Improve Slowly

This is a step by step, image by image process.  And we’re not finished yet.  You may find that the project needs further tweaking.  It’s not an issue of mathematical precision but rather one of controlling the position and warping in critical areas where the different perspectives from the different pictures collide.

Terry suggested dragging the image in the Fast Preview window instead of the above step in the Images Tab.  And indeed the Fast Preview has a Move/Drag tab with mosaic mode.  Unfortunately dragging an image will automatically drag all other images connected by CPs, so unless you do this only once before adding CPs, dragging won’t work. I found the way through the numeric input in the Images tab to be preferable.  It enabled me to go back and rework the positioning of individual images without losing the work done on CPs.
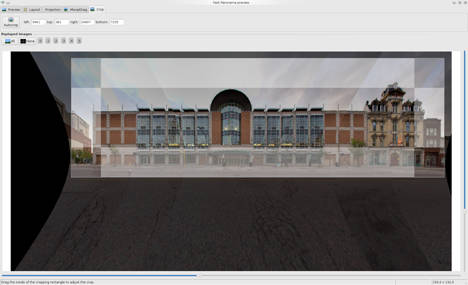
Move/drag in the Fast Preview window is useful associated with cropping functionality.  I use manual cropping in this case, it’s fast and intuitive.  When the mosaic looks good in the Fast Preview window, head to the Stitcher tab and render it.  Make sure to output both the blended panorama and all remapped images by checking the appropriate check boxes.  Hit the Stitch Now button, enter a prefix and go get a deserved break while the computer churns away.

Masking

Hugin has a built in masking tool.  Masking in the input images is more useful for panoramas than for mosaic, because in a well shot panoramas it is reasonable to assume that the images align naturally and the masking is only needed to exclude / include details.  With mosaics, the assumption is wrong, and I prefer to do masking in output images, already warped and aligned, together with editing and some other unspecified fiddling to achieve a visually pleasant result.

Post Processing

Below is a scaled rendering of the blended mosaic.  No post-processing applied yet.  The original is about 21.000 pixels wide.  It’s not bad, but “perspective collisions” are visible at the seams and will require retouching.  It’s time to prepare the project for your favorite image editor.

Copy all the rendered images into a single TIFF file.  On the command line, enter:

$ tiffcp prefix* layeredmosaic.tif

Open the resulting file with Gimp.  The layers will be perfectly aligned.  Add mask layers to them and start editing, or export to a Photoshop file if you are more comfortable with that image editor.  My Photoshop CS 2 (quite old, but still does the job) is not able to open properly the multi-page TIFF file.

Improvements

This was a quick proof of concept / tutorial.  If I was to do something serious with this image, I would probably re-shoot it, taking advantage of the building regularity and adding more images, one in between every pair of columns.

Conclusion

Reaching this advanced stage in the image creation process was relatively easy with Hugin.  Now, depending on your level of perfectionism and intended purposes, there are still hours of editing ahead before the file can be declared good to print.  I don’t have enough wall space available for this 3.5m / 11 feet long mosaic.  If you have and are interested in this or similar commissioned work, I’d like to hear from you.

Releases, Releases.

Somehow the end of the Gregorian calendar year seems to be a popular time for software releases. There have been a number of interesting releases in the past two weeks in the area of Free photography in general and panorama making in particular. Too many to mention them all.

The one that caught my attention is PTStitcherNG 3.0b by Prof. Dr. Helmut Dersch. Helmut has been at the forefront of panorama making software for more than a decade now, and his new tool optimizes for speed and memory footprint. A 1.5 gigapixel panorama will stitch within less than 100MB RAM. To me this comes very convenient: since I upgraded my photo gear the resulting images are too big to stitch on my ailing notebook maxed out on RAM.

Unfortunately for the time being it is free and not Free. Binaries are freely available for Windows, OSX, and OpenSuse 11.1 (x86_64). Users of Linux distributions other than OpenSuse will need to run the Windows binary through Wine and take a 30% performance hit. The currently distributed binaries only work on SSE3 processors. Helmut says that a source code release is pending the scientific publication of his results. For the Pentium M / Ubuntu 9.04 notebook whose life I’m trying to extend beyond shelf-date  I’ll have to wait for SSE2 binaries or for the source code. I worked around it by rsyncing the source images to my Kubuntu 9.10 office workstation and running PTStitcherNG there, remotely.

Another notable release is Enblend-Enfuse 4.0 that has been overhauled by Christoph Spiel and has spurned a release of newer versions of related GUIs,   ImageFuser0.7.4 by Harry van der Wolf and EnfuseGUI 2.1 by Ingemar Bergmark.

Last but not least, Bruno released Hugin 2009.4.0. completing the work I left unfinished, and started the release cycle for 2010.0.0. James topped the Holiday present by merging into trunk the much awaited new layout branch, with his Google Summer of Code project and Pablo’s XYZ  parameters for image position.

Pushing the Boundaries.

One of the constraints when shooting panoramas with Hugin (and with most panoramic tools) is the No Parallax Point (NPP). There are physical and logical reasons to turn the camera around it when shooting images for a perfect stitch: Physically, pictures taken from the same NPP have no parallax. Logically, the mathematics of panoramic software is simpler when assuming that all pictures are taken from the NPP.

Photographers build or buy panoramic heads to help them keep their camera’s NPP aligned with the point around which it is rotated. Unfortunately the panoramic head leaves an undesired footprint on the nadir. One technique to deal with the nadir is to move the tripod for an additional shot, often handheld. That shot is most often offset from the center of the panorama.

PTGui was the first panoramic tool to deal with an offset NPP. It requires the control points in the offset picture to be on a single plane – not an unreasonable assumption for the ground on which the tripod stands. Hugin has lacked this feature for a long time. Now it has been introduced by Pablo, inspired by the discussions preparing Dev’s Google Summer of Code 2009 project (that yielded another type of transform for mosaic mode, implemented by Daniel very recently in libpano.

Dev’s original project was about mosaics and not necessarily the nadir shot. I’m interested in mosaics too, I want to break away from the limiting factor of the sphere.

So the other day I went for a stroll in town, and I shot a few pictures. Hand held. With my son sitting comfortably in the back pack.XYZ_previewThe sphere is still somewhat a limiting factor, and so is the rectilinear projection.

No panoramic head was used to shoot this 18.000 pixels linear panorama. What is next?

Google Summer of Code 2009 Wrap Up

Another summer is over. The maples in my neighborhood are changing color and we just finished our third Google Summer of Code (GSoC) participation, the best ever. Like the previous two editions, GSoC has been a catalyst beyond the five project slots generously allocated to us by Google. GSoC has been more than money. More than an opportunity to attract fresh contributors and get things done. It has been first and foremost a transformational opportunity, making an inherently insider organization an open and outward looking one.

Allocation

Google generously allocated five slots to us and this year we decided to allocate one of them to a smaller Open Source project. It seems to me that there is an ideal mentoring organization size (or at least minimum size) for GSoC participation. Smaller mentoring organizations require a similar amount of administrative effort as larger ones. Sharing is a way of enabling smaller projects to participate while limiting the burden on Google’s Open Source Programm Office.

There are many small Open Source projects in our related field, and in talks I had with them most expressed interest. I decided to work with Professor Sébastien Roy’s Vision 3D Lab at Université de Montréal and his LightTwist project for a few reasons:

  • I needed to make a case to our community that sharing is in our interest. Indeed there was a very short discussion about LightTwist’s relevance to the Hugin community.
  • Meetings and contacts between members of the Hugin community and of the Vision 3D Lab go back to Libre Graphics Meeting (LGM) 2007. We share a similar culture / attitude.
  • Last but not least, I was looking for more academic contacts to promote GSoC recruiting efforts.

The experience worked better than expected. We even organized a joint display of Hugin artwork projected with Lighttwist at LGM 2009. I warmly recommend other organizations to do the same: Next year give a lift to a smaller project!

Recruiting

This was my biggest deception this year. I did put a lot of effort upfront – contacting professors at relevant faculties in my region and beyond. The turnout – at least for us – was zero. Recruiting is indeed our bottleneck. This year again we had more mentors than allocated students, so we rotated mentoring responsibilities. Our recruiting needs improvement.

Students

One of the biggest question was to hire new students or returning ones? I am thankful to my fellow mentors for changing my mind on this one, and I hope our faithful returning students will forgive me. Initially I even convinced one of last year’s students to participate as a mentor. Then I asked him to submit a project proposal. Thank you, Tim, for your flexibility! Student’s life is IMO the most beautiful period in one’s lifetime, enjoy it while it lasts!

Selection

Three months are a short period. To make the most out of it candidates must be up to speed from day one. Following the lead of other mentoring organizations, we introduced qualification tasks. Despite some controversy amongst a few vocal students, it has worked well for us. Our goal was to determine basic proficiency with the tools. Other organizations, notably x264, have put more effort in the qualifying tasks so that they also determine if the candidate has the skill to complete the task. It may be more work, but it is definitely best practice IMO, and we should consider putting in this upfront effort.

Meetings

Remote collaboration works better after a physical handshake. I interviewed all serious candidates by phone and try to organize as many face to face meeting with community members as possible. More by lucky circumstances than by design we managed to meet all students this year: two at LGM in Canada and three at a dedicated meeting in the UK. These meetings have been very productive. Even face to face meeting did not prevent us from failing one student, but they are useful and we should try to bridge physical distance in the future as well.

Projects

Our two returning students did not have to get up to speed with the code base and could take on more ambitious projects. And indeed they did, beyond my dreams and expectations.

James Legg, mentored by Bruno Postle, refactored code deep into the core to implement his new layout model. The model works. Minor quirks in specific situations will be fixed. This project corrects a design weakness, unintended heritage of the pre-HDR time.

Tim Hugent, mentored by Tom Sharpless, produced an automatic lens calibration tool. The calibrated lens model still need a lot of validation work through practical use in the field. The potential benefits are improved precision and, beyond panorama making (and Hugin) better images from less than perfect lenses. This project was the first step in an exciting new direction.

Lukáš Jirkovský, mentored by Andrew Mihal, brought deghosting (the removal of moving artifacts from multiple exposures) to the next level and made it available to enfuse, the preferred choice for photo realistic exposure bracketing. Also this project will continue after the end of GSoC.

Yulia Kotseruba, mentored by Sébastien Roy, added new blending algorithms to LightTwist, making it possible to extend the projection surface vertically and opening up new fields of uses such as dome projection or, given enough wall space, a low-cost high-resolution IMAX replacement. Work continues and will be published in a scientific review.

Last but not least a word about Dev Ghosh, mentored by Daniel German. Unfortunately we had to fail Dev because he had not achieved the agreed (and revised) milestone. To his credit he got the mathematics right – his MatLab implementation works. Chances are that the code will be implemented in our code base, sooner or later.

A big THANK YOU to all the students for their effort and dedication!

Update: The only reason to fail Dev was quantity. The quality of his work was excellent. Daniel has implemented it in Libpano and it may become the first chunk of 2009 code to be officially released, with the upcoming libpano 2.9.15.

Integration

We found the right recipe for this last year and we recidivate. During GSoC students focus on implementation. They will integrate their code after GSoC. As an encouragement, they will be sponsored a panoramic head from Nodal Ninja, an industry leader that sees the benefits of supporting Open Source software that drives sales of its hardware. At the time of writing, the first project has been already integrated in trunk. Thank you, Bill Bailey, marketing director for Fanotec.

Community Development

On this year’s mentoring organization application form there was one interesting question about “criteria used to select community members“. This lead to some introspection, following which I drafted this community charter. Thank you, Google Open Source Program Office, for giving us food for thoughts.

Speed

GSoC projects have accelerated the pace of development. Our sequential development process with trunk freezes and long release cycles was no longer adequate. I’ve taken it upon myself to re-engineer it and at the time of writing we’re getting ready to release for the first time under the new, parallel process. I hope we can integrate and release all the code developed for GSoC 2009 before Christmas, and that our project team will increase it’s capacity to absorb and release code changes.

Generations

After graduating university I was offered a job at a company that I still admire (I accepted another job because it gave me the opportunity to expatriate). That company had a three year cycle: the first year you’re hired as a junior and trained on the job. if you did it well the second year your boss moves on and you put your imprint on the job, adding to it what you have learned. On the third year, you train a junior to replace you and if everything went well you’re promoted to the next job. This helped the company stay nimble and up to date. We need a similar attitude in our project. People come and go, and we need to groom the next generation of committers before the current generation fades out; and to document our processes and know how for the perusal of the next generation. GSoC has been a great recruiting ground and our next project leader may be amongst this year’s GSoC students.

Conclusion

Before our GSoC participations, joining Hugin was a steep learning curve. Still today we get consistent feedback from GSoC candidates and students that getting up to speed with the code base is the biggest hurdle they face. Things have improved. In 2007 with an SDK for Windows developers. In 2008 with the equivalent for OSX developers and with build documentation for different platforms. This year it was the release process, and there is more on the plate for the years to come – much of this thanks to GSoC. Thank you, Google!

Give a Man a Fish

Groundhog protecting his holeSo the Hugin project team released 0.8.0 three weeks ago. What are the expectations, and what does release actually mean?

Some users, particularly in the Windows world, expect the release of a shrink-wrapped product. They expect to click, download, install, use. And of course everything for free.

Easy? Not so quick. What was actually released is nothing more than a tarball, an archive of the source code in a state known to build and work on the major supported platforms. So it could be used to produce executable binaries.

How are those binaries produced? What do they depend upon? What is to be produced? Who does it? How are they distributed? What is missing?

How

The user community has prepared platform-specific instructions. They may not be perfect but do the job.

Dependencies

There are some dependencies that need to be fulfilled for the recipes to work. Besides the obvious ones of enough disk space; a supported operating system; and installation of the building tools, Hugin 0.8.0 depends on other software packages, both at build time and at run time.

On the Ubuntu package description the dependencies are clearly listed. They are roughly the same for all platforms. They include enblend, enfuse, libpano.

What

On most Linux based systems a package manager takes care of the dependencies. This means that the packager only has to build Hugin-0.8.0 itself. The package manager will download and install the appropriate dependencies.

On OSX and Windows there is no package manager. The Hugin-0.8.0 binaries alone are useless. The packager has to do extra work.

Who

Anybody with access to a computer can act as a packager, use the instructions and the tarball to produce executable binaries and do whatever they want with it. It’s free.

Distribution

Anybody can put up the binaries for download anywhere on the internet. In the download section of this blog there are links. On top of that there are two distribution channels with special meaning: the package manager and the official Hugin download page.

The package manager is responsibility of the Linux distributors. They carefully test and approve each package that goes into their distribution. And they don’t backport often. For example, Ubuntu still supports its 8.04LTS distribution until April 2011 for desktops and April 2013 for servers, as well as 8.10, 9.04 and the upcoming 9.10. As of today, the binary of Hugin distributed by the package manager for Ubuntu 8.04LTS is Hugin-0.7.0_beta4. Users of Ubuntu 8.10 are still served with Hugin-0.7.0_beta5. Users of the most recent Ubuntu 9.04 have access to Hugin-0.7.0 binaries. And for the upcoming 9.10, Ubuntu’s plan seems to be to still ship Hugin-0.7.0. We hope that this will change but it is not up to us to change this.

Dependencies Revisited

Specifically, there are three dependencies that currently cause pain. In order of importance:

  1. Enblend and enfuse are mandatory. Without them, Hugin-0.8.0 does not work. The current enblend and enfuse packages have serious problems, causing them to crash. They are a regression compared to previous CVS snapshots, in particular to those versions delivered with the old Windows SDK and with the Hugin-0.7.0 installer for Windows. There are fixes in the staging branch of enblend-enfuse. And Harry has been using that branch to build the OSX Hugin-0.8.0 bundle until his Mac died.
    Unfortunately the staging branch does not build in Windows yet. I researched the problem and fixed part of it (accepted as revision 347 by Christoph Spiel on August 3). Thomas Modes had a look at it before going to holiday and added some more pieces to the solution. But it does not build yet because of Microsoft’s Visual C++ quirks.
  2. Libpano is mandatory. Until recently libpano had a minor but annoying problem: it reverted the language of the user interface to English. Daniel M. German and Thomas Modes solved it in the repository.
  3. A control point generator is a critical. Until recently the autopano-SIFT-C package had serious problems, causing memory leaks and crashes; failing where the previous version bundled with the 0.7.0 OSX bundle and Windows installer succeeded.

On systems with package managers (i.e. Linux) the packager can simply publish Hugin-0.8.0 and rely on the package manager to solve the above listed issues. For systems without package manager the packager must add them to the bundle/installer or to the SDK used to build it.

Distribution Revisited

Distributing a binary that is known to have a regression over previous versions as official release is bad practice. It not only affects the project reputation, it ruins a working system for those users who overwrite the working version with the newer one.

The OSX Hugin users community fixed the problem and an official OSX binary is available from the Hugin site. There is no solution yet in sight for Windows, so currently Windows users are directed to the 0.7.0 installer. Maybe we should direct them to the tarball instead?

Conclusion

Give a man a fish, and you feed him for a day. Teach a man to fish, and you feed him for a lifetime. This works with most of our users ond most supported platforms.

Unfortunately for some Windows users it does not seem to work. Give them free fish and they will come for more. Give them the freedom to feed themselves and they will ignore it.

Hugin 0.8.0 released!

hugin-logoBruno Postle released Hugin 0.8.0. This is the best Hugin ever and despite the 0 as major version number a very mature and usable piece of software. The highlights:

  • Fast Preview – James Legg’s 2008 Google Summer of Code project that makes the user interface much more responsive
  • Celeste – Tim Nugent’s 2008 Google Summer of Code project that prunes control points from clouds with more than 80% success rate and make stitching more precise
  • PTBatcher – Marko Kuder’s 2008 Google Summer of Code project that enable the batch processing of panorama project
  • Many new projections
  • A lot of small improvements and bugfixes.

A big thank you to everybody who contributed!

Hugin-0.8.0_rc5 released

hugin-logoMost likely the last release candidate for this series, watch out for 0.8.0 very soon.

It has been a long way: the majority of the code written during Google Summer of Code 2008 had been in the repository since late last year along with a few other new features such as the new libpano projections.

Nevertheless it was only available to those few courageous individuals who are not afraid of rough edges (the occasional crash) and who possess the so rare skills of basic English reading and typing that are absolutely necessary to follow the instructions.

Some of them were even able to make sense of the instructions beyond reproducing them. They contributed by helping others following in their footstep, and they even contributed some patches, automated the build process, etc. You know who you are, thank you, friends!

While 0.8.0 will be soon out, the clock is ticking. Students are at their mid-term evaluation with their projects for Google Summer of Code 2009 and it looks like we’ll have new features to add soon. Plus, there is some other user-contributed code that will be integrated after 0.8.0.

Full steam ahead!

Revisting Old Places

hugin-logoI’m currently at my parents in southern Switzerland. Usually this is a wonderful place with plenty of sunshine (there is an institute for solar research just around the corner). For the past three days it was under torrential rain (more than 150 liters per square meter in 12 hours). The rain has not stopped Fulvio Senore and Alessandro Ugazio from giving us a warm welcome on a train stop in Domodossola, Italy (restaurant panorama is in the making; the RAW files have been converted with RAWstudio; Hugin has stitched them; I’m struggling with the masks and layers in GIMP). My parents are enjoying their grandchild.

I had plans to meet old school friends and to take some pictures in old and familiar places. No pictures under the rain. Instead, I revisited a different kind of old and familiar places. It has been about a year since the last time I’ve looked back at the effort I initiated to document the Hugin build process. My hope for that page (and for the build and release process) was that it would take care of itself over time. While there is now a thriving community of builders and testers, some part of that effort had not materialized as I hoped. During the last LGM I discussed some of the learnings with Pablo and we’ll start implementing them after the 0.8.0 release. In the meantime, I started updating the page.

That page, with the pages linked from it, represent an important step to me: the stepping stone from user to contributor. When I joined Hugin, I was just a user. Actually, I was a pain in the neck user, asking for stuff all the time. I wish I could have contributed stuff, but I lacked the necessary knowledge and the learning curve looked daunting steep. So I contributed my chutzpah and organized our first participation to the Google Summer of Code in 2007. One feedback we got from the first crop of GSoC students was that the learning curve is daunting steep. So I’ve pushed and pulled around the community to ask those with the knowledge to document it into that bare structure I’ve started. With the help of many community members, and support from the core developers, we put together a documentation self-explaining enough to get more users over that stepping stone. It did not take long until it was picked up and we now have a thriving community of builders and testers. Moreover the instructions helped new developers (such as the 2008 and 2009 Google Summer of Code students) to get faster over the learning curve and become productive faster.

The build process is now self-sufficient. When dependencies change or features are added, the feedback loop between developers and builders is fast and efficient. The documentation still needs updating now and then. I look forward for the 0.8.0 release so that we can move on to improve the release cycle (and the closely related debugging cycle) along similar lines. But first, I look forward for the weather to clear, and to spend some quality time in the place of my youth.

Bend to Please

Equirect

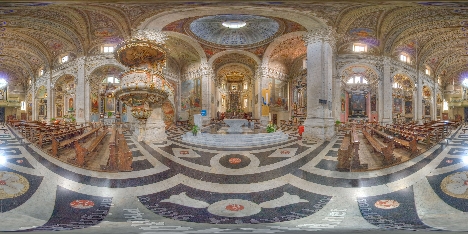
equirectangular 360°

Earlier this year I used the above full spherical panorama to test the new projections as they were added to libpano. You can view it from the inside here.

Those new projections devised by Tom, Bruno and Daniel, were not all. In his quest to satisfy our sense of what the world really looks like without being limited by the narrow field of view of the traditional rectilinear perspective, Tom Sharpless asked for permission to modify and use the image. A few weeks later he came up with a real WOW! He is currently working on implementing this and more into his Panini Perspective Tool.

Tom was meant to discuss his work at LGM but prior commitments and the lack of a teleporting facility makes it impossible for him to attend. We agreed that I will present his slides, and host a discussion on Panoramic Perspective Control. The main idea: use of panoramic photography techniques, coupled with computing, to achieve new images that break out of the physical boundaries set by traditional optics and appeal to the human sense of aesthetics.

As part of the talk, I’ll show how I followed into Tom’s footsteps and produced the image below.

PVsqueezed to be optically pleasant.

Tools

You will need

  • Tom’s Panini Perspective Tool, or if you want to do this in high resolution a recent (2009) version of Hugin.
  • A recent version of the GIMP. I had to build 2.6.x on my own box until Ubuntu 9.04 came along. Building the GIMP from code is not trivial but relatively well documented around the web.
  • A recent version of MathMap. Unfortunately MathMap is not yet packaged with Ubuntu. The 1.3.4 tarball will do. To my knowledge, nobody has got MathMap to work on Windows yet.
  • Tom’s PVSqueeze.mm script. Put it in the appropriate MathMap folder or copy&paste it into the “Expression” tab.

Process240° x 150° equirectangular pannini

  1. As so often, we start from an equirectangular image, the universal panorama format.
  2. Load the equirectangular in Hugin and extract an Equirectangular Pannini view of the area of interest. The flexibility of extracting an Equirectangular Pannini view is higher in Panini, but Panini’s resolution is limited by the video card’s memory. Hugin can do higher resolutions but has the disadvantage that the eye distance (horizontal compression) in libpano is fixed (patch, anyone?)
  3. Load the perspective into the GIMP.
  4. From the GIMP menu, open the Filter MathMap.
  5. Load the PVSqueeze filter.
  6. Click Preview to see the low-resolution live image.
  7. In MathMap’s User Values tab, adjust the values and see the live image morph until you like it.

MathMapping

From MathMap’s homepage: “MathMap is a GIMP plug-in which allows distortion of images specified in a simple programming language. For each pixel in the generated image, a script is evaluated which returns a color value. The script can either refer to a pixel in the source image or can generate colors completely independent of the source.” MathMap’s is a project of Mark Probst.

PVSqueeze

Using Tom’s PVSqueeze filter:

  1. Set the horizontal field of view (hfov) and eye distance (eyeDist) sliders roughly right for your input image.
  2. Adjust the vanishing point (VP) position (VPX, VPY), and the slopes of the 4 perspective edges (XXangl) so they line up with the appropriate edges in your image. There aren’t any drawn lines, but the change of image shape is pretty easy to see. Note you have to set the projection center Y identical to the VP Y by hand, or you get a black triangle in the middle (bug; but misaligning them can help you see just where the VP is).
  3. Adjust the shift modifiers for the upper and lower Vees to suit.  Basically these swing the pixel shift direction between straight up and down — which preserves verticals like chair legs — and radial with regard to the VP — which makes most floor patterns look nicer but also creates the curved diverging lines. The shift direction varies with vertical position, from vertical at the VP to radial farther out.  XVlim controls the vertical level at which this transition starts, and XTwid the width of the transition zone.  You can set them for pure vertical or pure radial shift, or some blend.
  4. Hit OK, review the full size result in the Gimp window; save or go back and adjust some more.

Next

So we used some smart math and arbitrary parameters to bend a captured panoramic image to please our taste. In doing this, we connected back to the Renaissance tradition of perspective on a mathematical basis. The resulting high-resolution picture is currently being printed on canvas to be displayed at the Ultra Wide Views exhibition that opens May 6 in Montréal, Canada. At Libre Graphics Meeting I will show more detail and I hope we can discuss how to classify the different projection types and make them more accessible to graphic artists.

Pannini Again

Pannini as intended, 230°

Pannini as intended, 230°

After I published samples of the new libpano projections in Hugin, Bruno found that Daniel’s implementation in libpano does not perform like his original Mathmap implementation. Daniel started a thread to unify the opinions on what the projection should look like, and the result is that Hugin now has two new projections instead of just one: Pannini (Bruno’s) and Equirectangular Pannini (Daniel’s). The name will be corrected to reflect the correct spelling of Giovanni Pannini, the Italian painter who inspired Bruno’s research. As of SVN revisions 921 (libpano) and 3577 (Hugin) this is not yet the case, but the functionality is not affected.

Another interesting finding is that Pannini’s projection is the same as the Recti-Perspective projection that Max Lyons will introduce in the next version of PTAssembler, the most advanced of the proprietary stitchers in terms of post-processing projections.

Equirect Pannini 230°

Equirect Pannini 230°